Rhino Roofing & Restoration

Roof Underlayment Installation in Taylors, SC

Roof underlayment installation in Taylors, SC creates a secondary layer beneath the finished covering. Rhino matches the material and lap sequence to the deck, roof type, weather exposure, flashing, and vulnerable details.

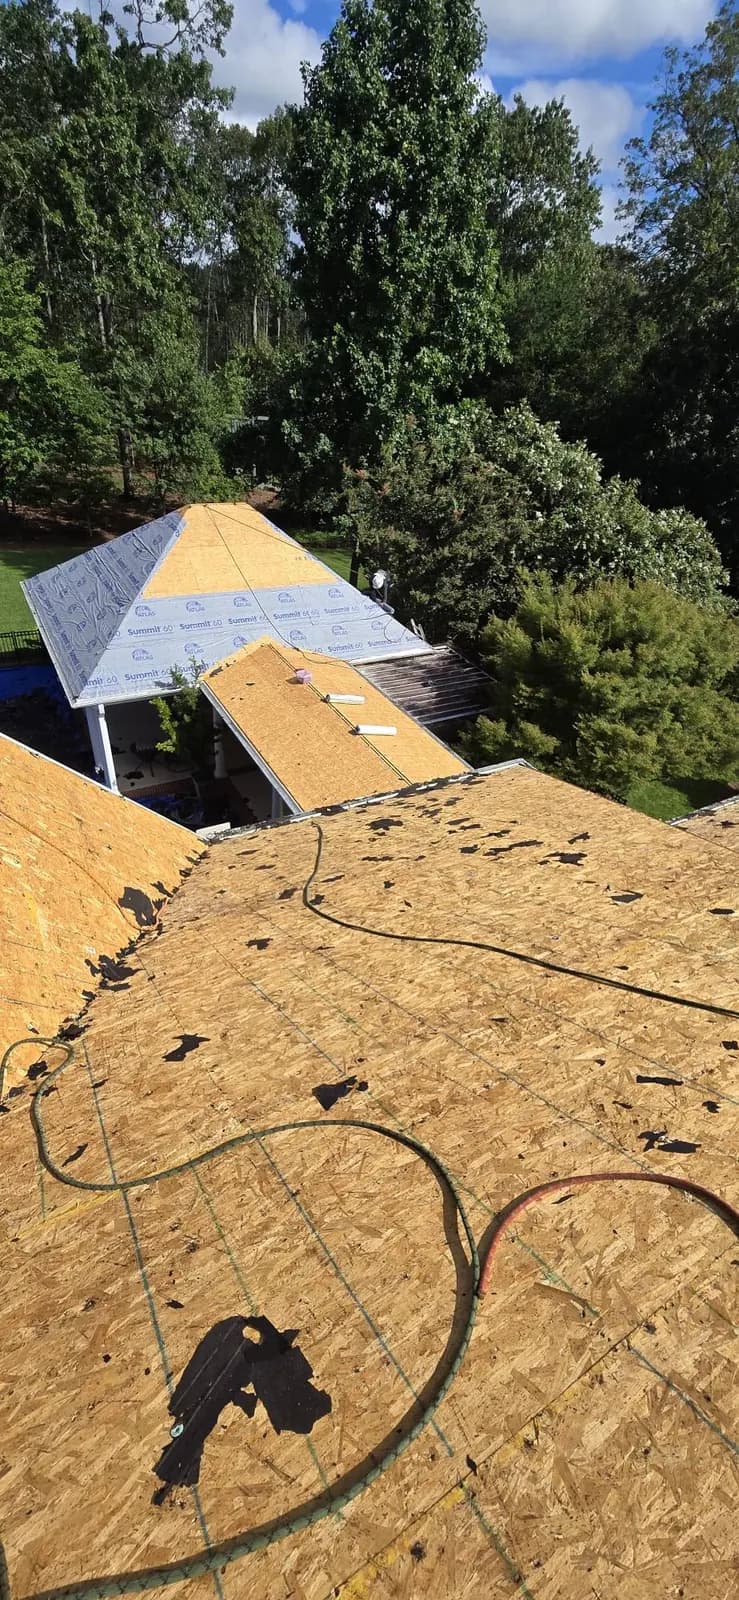
Roof underlayment being installed over new decking

What roof underlayment is designed to do

Shingles and metal form the main weather surface. Underlayment sits between that covering and the deck, providing temporary dry-in and a secondary path for incidental moisture that gets beneath the exterior material. Its performance depends on suitable deck preparation, laps, fastening, exposure, and integration with edges and penetrations.

Rhino uses ice-and-water membrane around dormers, valleys, roof penetrations, and chimneys during replacement work. Those focused areas carry more water or interrupt the roof plane. The rest of the roof receives the underlayment selected for the system and project conditions, following manufacturer and applicable code requirements.

01Service guide

Common roof underlayment types

Traditional asphalt-saturated felt has a long roofing history and comes in different weights. It can wrinkle when wet and has handling and exposure limits. Fastening, overlaps, slope, weather, and the finished covering affect where it remains a suitable choice.

Synthetic underlayment is often lighter, stronger for its weight, and available in wide rolls. Surface traction, fastener requirements, exposure rating, vapor properties, and compatibility vary by product. The word synthetic does not make every roll interchangeable beneath every roof.

Self-adhered membrane bonds to a prepared deck and seals around many fasteners. It is commonly used for higher-risk areas rather than automatically across every entire roof. Temperature, primer, substrate, laps, and future removal all affect installation and cost.

  • Felt

    A traditional asphalt-based sheet with specific lap, fastening, handling, and weather limitations.

  • Synthetic sheet

    A manufactured underlayment selected by roof system, traction, exposure, and product requirements.

  • Self-adhered membrane

    A bonded water barrier used where concentrated flow or penetrations raise leak risk.

  • Specialty layer

    Metal, low-slope, high-temperature, or other assemblies may call for system-specific products.

02Service guide

Deck preparation before underlayment

The deck should be sound, dry, secure, and free of sharp debris. Raised nails, broken panel edges, large plank gaps, delamination, and old patch material need attention. Underlayment can bridge a small joint but cannot make soft sheathing hold roof fasteners.

Tear-off may reveal abandoned vent holes, satellite mounts, and irregular repairs. These openings should be closed with supported material before the new layer passes over them. Bill reviews exposed conditions while installation is active, when questionable work can still be corrected directly.

Dust, frost, moisture, oil, and old adhesive can reduce the bond of self-adhered products. Temperature limits matter. The crew follows the selected product rather than assuming a membrane will stick to any deck in any weather simply because the backing was removed.

03Service guide

Laps, fasteners, and temporary exposure

Underlayment is installed from the low edge upward so upper courses lap over lower ones. End laps and side laps follow product, pitch, and code requirements. Wrinkles, fish-mouths, reverse laps, and torn areas can redirect water beneath the sheet.

Fasteners should match the underlayment and expected exposure. Staples or nails used outside approved conditions may tear or hold poorly in wind. Cap fasteners spread load on many synthetic products. Finished roofing later covers the fasteners, but their placement still affects dry-in security.

Exposure ratings are limits, not a reason to leave a roof unfinished. Sun, wind, rain, and foot traffic age the sheet. Open valleys, wall joints, penetrations, and ridges may remain vulnerable even when the field is covered. Rhino schedules finished roofing as the intended protection rather than treating underlayment as a seasonal roof.

04Service guide

Underlayment at edges, valleys, and penetrations

Eave and rake details need a planned relationship between deck, drip edge, underlayment, starter, fascia, and gutter. The exact order can vary with location, product, roof edge, and requirements. Rhino uses the project detail instead of applying one memorized sequence to every edge.

Valleys receive runoff from two slopes and need protective material placed without wrinkles or poorly located fasteners in the flow line. Chimneys, dormers, walls, skylights, and pipe openings require membrane shaped around the deck connection before the visible flashing is completed.

The membrane is a backup beneath proper flashing. It should not be exposed as the working seal around a pipe or relied upon to bridge an open masonry joint. Rhino builds the hidden water barrier and the visible drainage detail as separate layers that support each other.

05Service guide

Underlayment beneath shingles and metal

Asphalt shingle systems need an underlayment approved for the shingle, deck, slope, and warranty. Starter, valleys, flashing, and ridge ventilation interrupt the sheet in planned ways. High-wind or low-slope conditions may change laps and product requirements.

Metal roofs can reach higher surface temperatures and move with daily temperature change. The selected underlayment must suit the metal system, roof pitch, panel attachment, expected heat, and any slip or separation needs. An ordinary sheet chosen only by price may not belong beneath a long-service metal roof.

Low-slope membrane roofs use different assemblies with insulation, cover boards, vapor layers, and finished single-ply membrane. Calling every hidden sheet underlayment can create confusion. Rhino identifies each layer by its job so owners know whether they are discussing temporary dry-in, vapor control, or the actual weather membrane.

06Service guide

Repair limits and underlayment records

Underlayment usually cannot be replaced across an existing roof without removing the covering above it. A local repair opens enough shingles or metal to expose the damaged area, then new material is tied beneath upper layers and over lower layers. Surface sealant cannot recreate a missing hidden lap.

During full replacement, photographs of valleys, chimneys, dormers, pipes, skylights, and wall connections provide a record before the roof closes. Homeowners rarely see these details again. Rhino's hands-on review while work is underway adds accountability to material that disappears by design.

Keep the underlayment brand or type, roof-system information, installation photographs, and warranty records. If a future repair opens the roof, those notes help the contractor choose compatible material and understand how far the existing membrane extends around the detail.

07Service guide

Quality checks before the underlayment disappears

The crew can review deck coverage, course direction, end laps, side laps, cap fasteners, tears, wrinkles, and exposed edges before shingles or panels arrive. Valleys and wall connections should remain visible long enough to confirm that membrane turns and overlaps in the planned direction.

Delivery traffic and installation footwork can damage a completed sheet. Bundles should not drag across it, and sharp flashing corners should not be dropped onto open field areas. A torn section needs an approved repair with enough overlap; simply laying the next shingle over the cut leaves the hidden backup broken.

Rhino's active-installation review is valuable at this stage because the homeowner cannot inspect the layer later. Representative photographs create evidence of the work without implying that every square inch can be seen in one image. The final roof then covers a checked, documented secondary barrier.

How we approach it

Prepare the deck and build every lap downhill

Underlayment work moves from a sound base to edges, field courses, vulnerable areas, flashing, and prompt finished-roof coverage.

  1. 01

    Select and prepare

    Deck, roof material, slope, temperature, exposure, edge details, and vulnerable areas guide product choice.

  2. 02

    Install the hidden layer

    Courses, laps, fasteners, valleys, penetrations, walls, and repair points are placed in water-shedding order.

  3. 03

    Cover and document

    Finished roofing and flashing protect the sheet while representative hidden details are recorded.

Helpful answers

Roof Underlayment Installation questions

Underlayment questions are easier when its backup role is separated from the finished roof and from low-slope weather membranes.

Is synthetic underlayment always better than felt?

No single product is best for every roof. System approval, deck, slope, exposure, traction, temperature, vapor properties, fastening, warranty, and budget guide the choice. Rhino matches the sheet to the project.

Can underlayment stop a leak without new shingles?

It is a secondary layer and temporary dry-in aid, not the intended finished roof. A permanent repair restores the exterior covering and flashing as well as any damaged hidden membrane.

Where does Rhino use ice-and-water membrane?

Rhino uses it around dormers, valleys, roof penetrations, and chimneys during replacement work. The exact layout follows roof shape, selected system, manufacturer requirements, and applicable code.

Can underlayment be added without removing my roof?

Broad installation normally requires removal of the covering above it. A contained repair may open a local area and integrate new membrane, but it must tie into existing layers in the proper water-shedding direction.

Ready when you are

Give the finished roof a carefully built backup layer.

Contact Rhino about roof underlayment installation in Taylors, SC during replacement, new construction, or a multi-layer roof repair.